Last year my mom picked up a kit to make "cake pops" but we didn't get around to using it. Yesterday she watched the kids for a couple hours for us to do what meager Christmas shopping we could afford. It's going to be a skimpy Christmas, but everyone will have something to open this year.
The kit didn't go exactly as planned. The fondant, having been in the box nearly a year, had become a solid thick consistency that would never mix well. When we went to melt the colored wafers, lo-and-behold, they too had gotten old. We tried the pink first, but it didn't melt. It just became a crumbly and very hot mess. Then I tried the blue, but only succeeded in burning it black - it still didn't melt. Then our first attempts at putting some kind of frosting on them was a very messy and frustrating experience. So here's my ad-libbed way to make these in the future with less frustration, using things easily found in most stores.
The kit didn't go exactly as planned. The fondant, having been in the box nearly a year, had become a solid thick consistency that would never mix well. When we went to melt the colored wafers, lo-and-behold, they too had gotten old. We tried the pink first, but it didn't melt. It just became a crumbly and very hot mess. Then I tried the blue, but only succeeded in burning it black - it still didn't melt. Then our first attempts at putting some kind of frosting on them was a very messy and frustrating experience. So here's my ad-libbed way to make these in the future with less frustration, using things easily found in most stores.
Cake Pops
Ingredients:
One boxed cake mix (plus whatever it calls for to complete it)
One container of store-bought frosting
Sprinkles
Popcicle sticks
Large piece of styrofoam (1/2 inch thick)
Step 1: Bake the cake according to the instructions on the box. Let it cool until you can remove it from the pan.
Step 2: Crumble the cake into a large mixing bowl. Stir in just enough frosting that it sticks together when you roll it into a ball. If it's too crumbly and dry, add more frosting. Be careful not to add too much (which will make it goopy and sloppy).
Step 3: Roll the cake/frosting mix into balls about 1-inch across. Stick one popcicle stick in each ball, about half way into the ball. Stick the other end of the popcicle stick into the styrofoam slab, making sure the cake balls don't touch. Put the styrofoam stand with all the cake pops in the refrigerator to set for at least 30 minutes.
Step 4: Put some frosting into a microwave-safe container, and warm it just enough to produce a creamy smooth consistancy. It shouldn't be runny or hard. Pour your sprinkles into small containers.
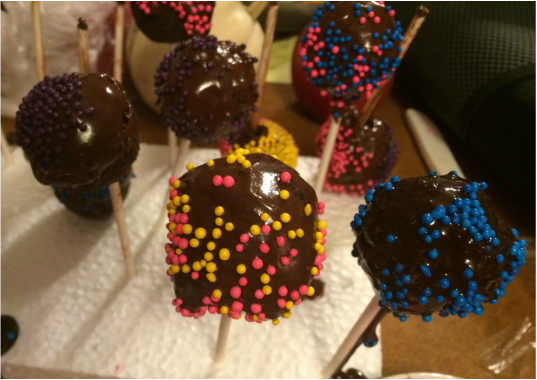
Step 5: Take cake pops out of the refrigerator. One at a time, take a cake pop off the stand. Take the stick out of the ball, dip the stick into the frosting, then back into the existing hole in the cake ball. Using a butter knife or a spoon, spread frosting over the cake ball completely. Make sure the frosting goes all the way to the stick. Add sprinkles to your desire. Replace the cake pop to the stand and work on the next one. Heat the frosting if it starts to harden up again.
Step 6: Once all cake pops are decorated and back in the stand, place the stand back in the refrigerator for an additional 30 minutes.
~~~~~~~~~~~~~~~~~~~~~~~~~~~~~~~~~~~~~~~~~~~~~~~~~~~~~~~~~~~
Now, I must add a few notes here. We used chocolate cake and chocolate frosting. I'm sure this would work just fine with any colored cake and/or frosting. If you're feeling particularly crafty, you could buy white frosting and dye it different colors to make different colored cake balls.
The original project had melting wafers and a piping bag to make colored stripes. We ditched this idea as the wafers weren't melting, and the kit came with four colors and only one piping bag (a recipe for disaster with five kids all wanting their own color and to do it themselves). A plastic baggy with the corner cut off would workin a pinch if you don't have a piping bag. Feel free to add this to your cake ball popcicle project.
Don't attempt to dip the cake balls in the frosting. Two things happened when we tried this. First, when put back into the styrofoam tray, they start to drip all over the place losing frosting and sprinkles all over the counter. Then a couple of them succombed to the additional frosting weight and ended up sliding down the stick becoming a cake ball kabob. We found that frosting them by hand with a butter knife eliminated both of these problems.
Also, the instructions said to refrigerate after decorating. As you may have guessed by now, we skipped this part and the kids just dove in and ate them as soon as they were decorated. Nobody exploded, messes were minimal (once the frosting had cooled on the cake balls), and they tasted fine, so really, I'm not sure why they need to cool again. Perhap it's to help the frosting set, but ours cooled just fine at room temperature and the kids just ate them from the side of the tray we had started on, so they were already good to go. Twenty was enough to sugar-buzz five kids with one or two adults taking a taste test as well. Using a full box of cake mix, I can only assume you'd end up with about twice what the kit offered (40-50 pops depending how big you make them).
Overall, the kids loved this project. Next time I will make sure we do it the easier way without the kit, and we'd plan it earlier in the day so they're not bouncing off the walls at dinner time. They loved putting their own sprinkles on almost as much as they enjoyed eating them.
One boxed cake mix (plus whatever it calls for to complete it)
One container of store-bought frosting
Sprinkles
Popcicle sticks
Large piece of styrofoam (1/2 inch thick)
Step 1: Bake the cake according to the instructions on the box. Let it cool until you can remove it from the pan.
Step 2: Crumble the cake into a large mixing bowl. Stir in just enough frosting that it sticks together when you roll it into a ball. If it's too crumbly and dry, add more frosting. Be careful not to add too much (which will make it goopy and sloppy).
Step 3: Roll the cake/frosting mix into balls about 1-inch across. Stick one popcicle stick in each ball, about half way into the ball. Stick the other end of the popcicle stick into the styrofoam slab, making sure the cake balls don't touch. Put the styrofoam stand with all the cake pops in the refrigerator to set for at least 30 minutes.
Step 4: Put some frosting into a microwave-safe container, and warm it just enough to produce a creamy smooth consistancy. It shouldn't be runny or hard. Pour your sprinkles into small containers.
Step 5: Take cake pops out of the refrigerator. One at a time, take a cake pop off the stand. Take the stick out of the ball, dip the stick into the frosting, then back into the existing hole in the cake ball. Using a butter knife or a spoon, spread frosting over the cake ball completely. Make sure the frosting goes all the way to the stick. Add sprinkles to your desire. Replace the cake pop to the stand and work on the next one. Heat the frosting if it starts to harden up again.
Step 6: Once all cake pops are decorated and back in the stand, place the stand back in the refrigerator for an additional 30 minutes.
~~~~~~~~~~~~~~~~~~~~~~~~~~~~~~~~~~~~~~~~~~~~~~~~~~~~~~~~~~~
Now, I must add a few notes here. We used chocolate cake and chocolate frosting. I'm sure this would work just fine with any colored cake and/or frosting. If you're feeling particularly crafty, you could buy white frosting and dye it different colors to make different colored cake balls.
The original project had melting wafers and a piping bag to make colored stripes. We ditched this idea as the wafers weren't melting, and the kit came with four colors and only one piping bag (a recipe for disaster with five kids all wanting their own color and to do it themselves). A plastic baggy with the corner cut off would workin a pinch if you don't have a piping bag. Feel free to add this to your cake ball popcicle project.
Don't attempt to dip the cake balls in the frosting. Two things happened when we tried this. First, when put back into the styrofoam tray, they start to drip all over the place losing frosting and sprinkles all over the counter. Then a couple of them succombed to the additional frosting weight and ended up sliding down the stick becoming a cake ball kabob. We found that frosting them by hand with a butter knife eliminated both of these problems.
Also, the instructions said to refrigerate after decorating. As you may have guessed by now, we skipped this part and the kids just dove in and ate them as soon as they were decorated. Nobody exploded, messes were minimal (once the frosting had cooled on the cake balls), and they tasted fine, so really, I'm not sure why they need to cool again. Perhap it's to help the frosting set, but ours cooled just fine at room temperature and the kids just ate them from the side of the tray we had started on, so they were already good to go. Twenty was enough to sugar-buzz five kids with one or two adults taking a taste test as well. Using a full box of cake mix, I can only assume you'd end up with about twice what the kit offered (40-50 pops depending how big you make them).
Overall, the kids loved this project. Next time I will make sure we do it the easier way without the kit, and we'd plan it earlier in the day so they're not bouncing off the walls at dinner time. They loved putting their own sprinkles on almost as much as they enjoyed eating them.
 RSS Feed
