How To Build A Large Chicken Brooder
It's early 2018 and we have decided to delve into raising some hatchery chicks. We've done some basic research, we're pretty confident we know what we're doing. We've looked at different brooder plans, videos on how to make brooders, and reviews on brooder kits. After a lot of comparing, we decided the best option for us would be to build our own custom brooder.
A note here - the only space we have available that doesn't get below freezing at night and isn't in the kitchen, is our tiny basement (think of it more like a large walk-in pantry). We have ordered a surprise box that is guaranteed to contain at least 40 birds of varied species and breed. As such, we need enough space for 40-50 birds to go from cute tiny chicks to ready to join the free-range mixed flock in six weeks.
From everything I've seen and read, the initial brooder boxes tend to be quite small, and they are typically only for the first two weeks. Once the chicks reach 14 days old, they need to be upgraded to more space. So, why not start out with more space? Initially the food and water will be near the heat lamp, or a second heat lamp can be added to the other end of the large brooder box. It has to be cleaned daily, regardless.
This plan offers a brooder box that totals 8' x 4' of space, or can be broken down into smaller areas to separate chicks (two 4' x 4' boxes, four 2' x 4' boxes, or two 2' x 4' and one 4' x 4' box). Of course you can also start with smaller or separated boxes and remove the separators (or start big and add separators) as needed.
What You'll Need:
For the framework:
2 - 2' x 8' boards
1 - 8' 2x2 board
2 - 2' x 4' boards
1 - 4' x 8' insulation board (not Styrofoam)
Before the birds come:
1 brooder light fixture (w/ clamp and red bulb)
1 feeder
1 waterer
1 cookie drying rack
Pine shavings (large flakes, not sawdust)
Thermometer
Extension cord (as needed)
Chick Starter feed
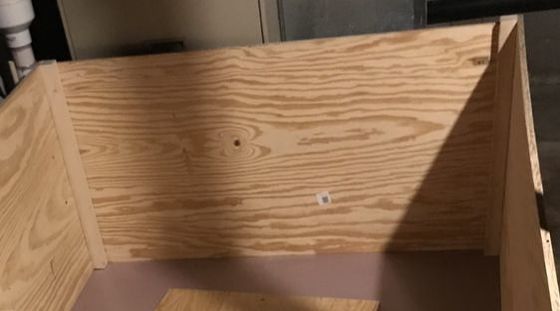
Step One - Select A Location
This is a large, heavy, and hard-to-move brooder box. You'll want to set it up where it will be kept. Pick an area that is away from drafts, protected from predators, and is near electricity. It will also be easier if you select a location that will make it easier to feed, water, and clean the cage every day.
Once you've chosen your location, lay the insulation board on the ground. This will be the bottom of your brooder. It will keep your little chicks up off the floor, insulate them from potentially cold ground, and prevent some moisture issues that can come up with some flooring.
Once you've chosen your location, lay the insulation board on the ground. This will be the bottom of your brooder. It will keep your little chicks up off the floor, insulate them from potentially cold ground, and prevent some moisture issues that can come up with some flooring.
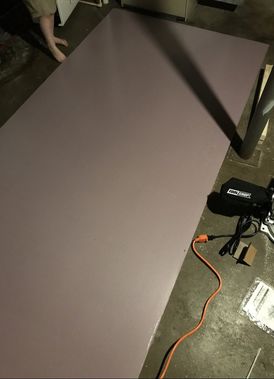
We chose our basement to build this brooder because it offered a heated space that wouldn't be in the way of daily activities.
Step Two - Cut Your 2 x 2s
Take your eight foot long 2x2 and cut it into 2' sections. This will give you four 2-foot long 2x2s.
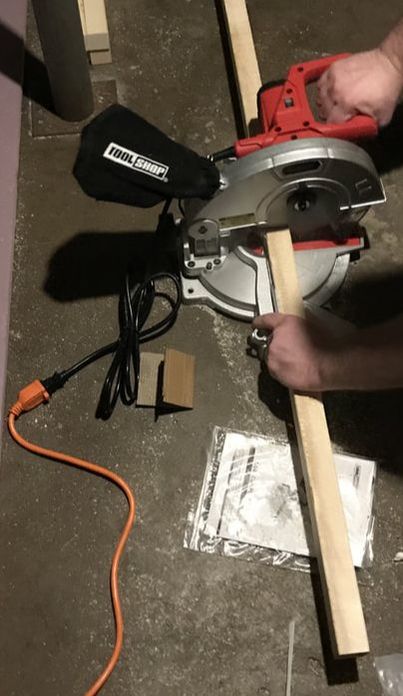
My husband enjoyed breaking in the new miter saw we bought for this project.
Step Three - Line Up Your Walls
From here on out, it might be easier to assemble with two people, but it is still possible to do it alone.
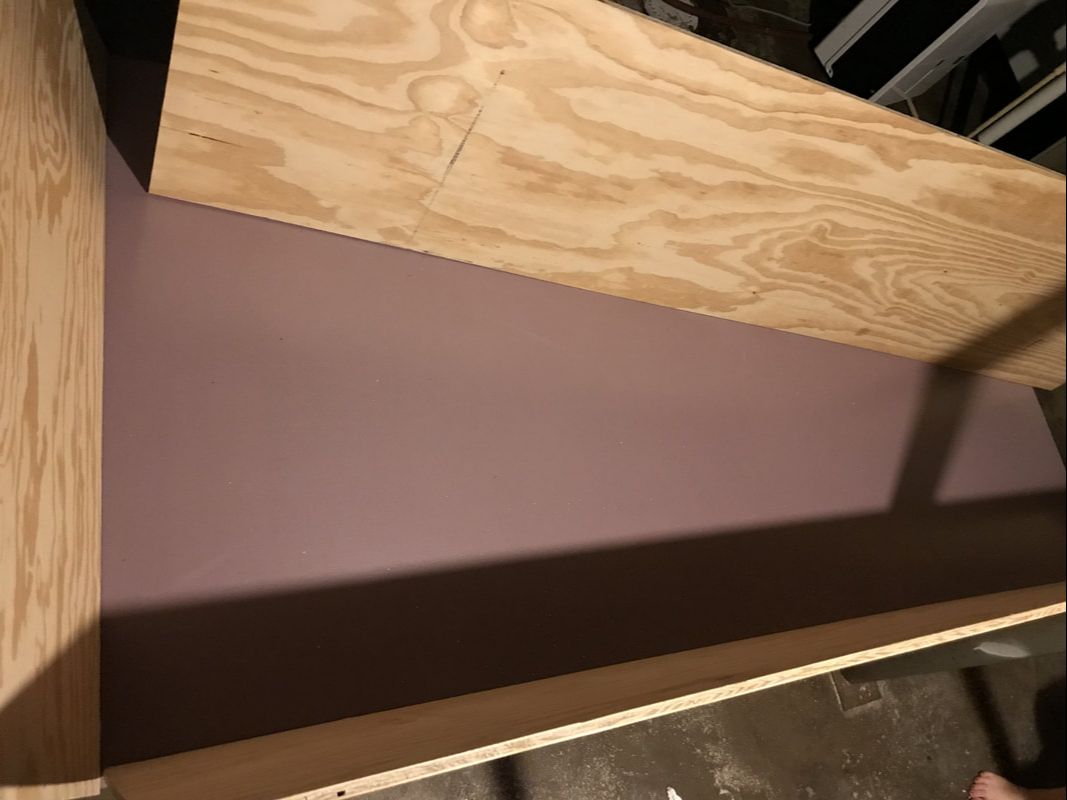
Put all of your walls where they're going to be. Your two 2' x 8' boards will go along the 8' length of the insulation board, and the two 2' x 4' boards will go along the shorter ends of the insulation board.
A note here: The long boards will take up the entire length of the insulation board, so the two end pieces should actually sit on the ground, not on the insulation. The spacing will force the insulation board to stay wedged between the end boards and help to prevent any sliding or moving around.
Step Four - Secure Your Corners
One at a time, bring your corners together. Make sure they are straight in line with the insulation base, and square them up using one of the 2' sections of 2x2.
Remember, the long walls should be sitting on top of the insulation board, while the short end pieces should be on the floor but flush against the short end of the insulation board.
Use two screws per side, one toward the top, and one toward the bottom, to secure both edges to the corner piece. Repeat for all four corners.
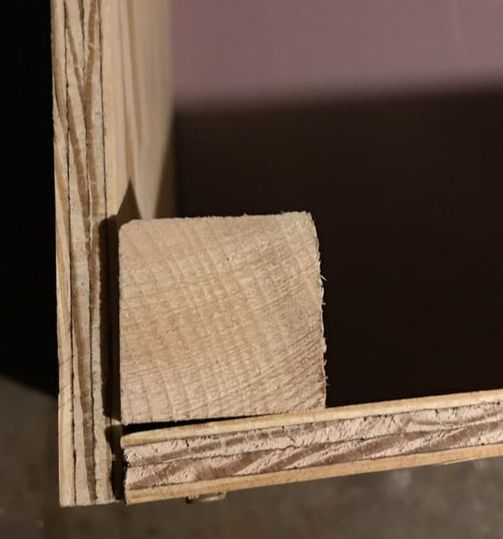
Remember that the short ends of this brooder will be slightly lower than the long ends due to the depth of the insulation board and the ends resting on the floor instead of the board.
If you decide to separate the brooder box into sections, you will need one more 2' x 4' board, and one more 8' length of 2x2 (cut into 2' lengths) for each separator panel you want to install.
Select where you want the separator, hold the 2' x 4' board in place, and secure the 2' lengths of 2x2 on either side of the new board where it connects to the long wall. Use screws to fasten the 2x2's to the longer side boards, but do not screw the separator board in place. This way you can remove it if you need to.
Select where you want the separator, hold the 2' x 4' board in place, and secure the 2' lengths of 2x2 on either side of the new board where it connects to the long wall. Use screws to fasten the 2x2's to the longer side boards, but do not screw the separator board in place. This way you can remove it if you need to.
Preparing For Chicks
Once you're done admiring your handiwork at assembling the brooder box, it's time to get ready for your babies to arrive! Always have your brooder set up before your chicks arrive to assure they can immediately get warmed up and comfortable.
You'll want to add enough bedding that the area is about 1-2" deep.
You'll want to add enough bedding that the area is about 1-2" deep.
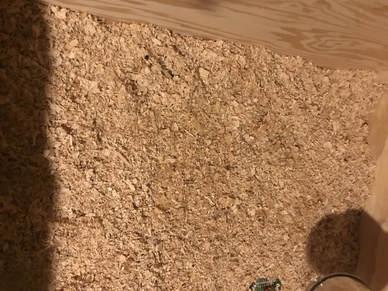
We happened to have two partial bags of pine shavings in the bunny barn, so that's what we used initially. The whole 4' x 8' space will take 1.5 to 2 bags of bedding to get it about an inch deep. Your measurements may vary based on the size of the bag of bedding available to you.
Install your heat lamp to hang 12-18 inches from the bedding. The distance will be determined by your light wattage and other factors. Put your thermometer under the light on top of the bedding and leave the light on for a while. Your goal is to have 100-degrees under the heat lamp at ground level. As they grow, you'll want to move the light further away to slowly decrease the temperature as they grow, but for right away, you want 100-degrees on the bedding directly beneath the lamp.
Remember to practice caution here. Lights and bedding can be flammable. Make sure your light is secured properly to prevent accidents. We loop the cord around a screw, and then we also loop the extension cord around another loop on the ceiling, so even if one loop somehow manages to come undone, the second loop will keep the light up off the bedding. Also keep the light away from the sides, as wood is flammable too, and it's always better to be safe rather than sorry. We use and recommend the reflector light fixtures with the wire guard in front to further help prevent accidental fires if the lamp does fall.
Remember to practice caution here. Lights and bedding can be flammable. Make sure your light is secured properly to prevent accidents. We loop the cord around a screw, and then we also loop the extension cord around another loop on the ceiling, so even if one loop somehow manages to come undone, the second loop will keep the light up off the bedding. Also keep the light away from the sides, as wood is flammable too, and it's always better to be safe rather than sorry. We use and recommend the reflector light fixtures with the wire guard in front to further help prevent accidental fires if the lamp does fall.
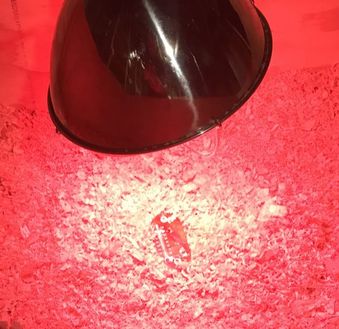
Always test your temperature and adjust your distance BEFORE chicks come! You want it set up and working before they even arrive!
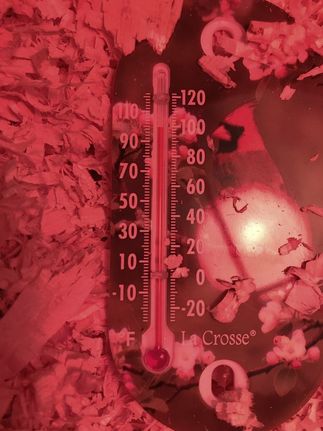
You want your thermometer to read 100-degrees (F) directly under the lamp. Any higher, and the lamp should be moved further away. Any lower (initially) and the lamp should be lowered. If you're not reaching the needed temperature and the lamp is getting too close, you should get a higher wattage bulb. We are using 75 watt bulbs in fixtures that could handle up to 300 watts in the event we need to change to a higher bulb for more heat output.
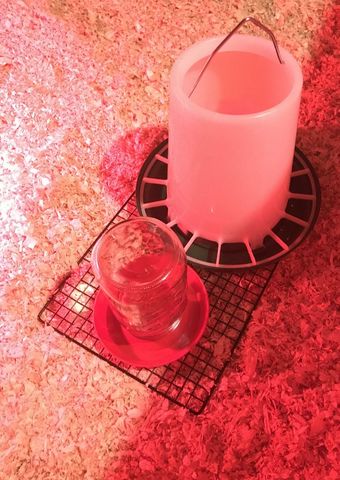
Put the cookie cooling rack near the light, but not under it. You want the chicks to stay warm while they're eating, but you don't want the food and water containers to take up their warm spot. Add the feeder (filled with chick starter feed), and the waterer to the cooling rack.
The rack will keep the food and water dishes slightly elevated, just enough that the chicks can easily step up and get to the food and water, but they are less likely to get bedding in their dishes and if they make a mess, it's more contained. Under the rack will need to be cleaned frequently, but it will keep your chicks out of wet bedding better than if it was just sitting on the floor of the brooder.
Follow your hatchery's instructions on any additions to the water. remember, warm water the first day to help them get and stay warm after they arrive is a good idea.
I suspect we may end up making some kind of resevoir underneath this set up - perhaps a paint tray - to help catch fallen feed and water without mucking up the bedding.
Once you're all set up, you've checked your temperature, your lighting is at the right height, and your water and food containers are filled and ready, it's time to add your chicks!
Make sure you dip each chick's beak into the water before releasing them into their new home for the very first time. They've likely spent their first few days in a box going through the mail, so they tend to be thirsty, stressed, and often cold. Once you've dipped their beaks, observe them closely for 24 hours but refrain from handling them unless absolutely necessary.
If your chicks are all huddled up under the light, they may be too cold and you should lower the light a little to increase the heat. If your chicks are all along the farthest edges of the brooder, or are panting, the light is too hot and should be moved further away to lower the temperature. Read your birds - try to understand what they're telling you. Make adjustments as needed. Perhaps moving the food and water dishes closer or further from the light, or adding an additional feeder or waterer if one seems to be too busy (this will vary depending on how many chicks you have in one pen).
