How To:
Build A
Raised Strawberry Bed
In 2018 we set out to build a raised strawberry garden. In the past, we've grown strawberries in the ground or in containers. The problem is that we've never had much luck keeping the in ground beds from getting overwhelmed with grass and weeds, and the container strawberries never make it through winter. With more space in the new homestead, we decided a raised bed is the way to go.
I looked at tons of designs, browsed websites, read blogs, and finally came up with a design I liked. Now, anyone who knows me will tell you - I have a lot of creative ideas in my head, but my brain doesn't give me assembly instructions. So I drew out a rudimentary picture of what I wanted with some specifications, and I handed it off to my husband. He's the builder. His brain can look at something and figure out how to assemble it.
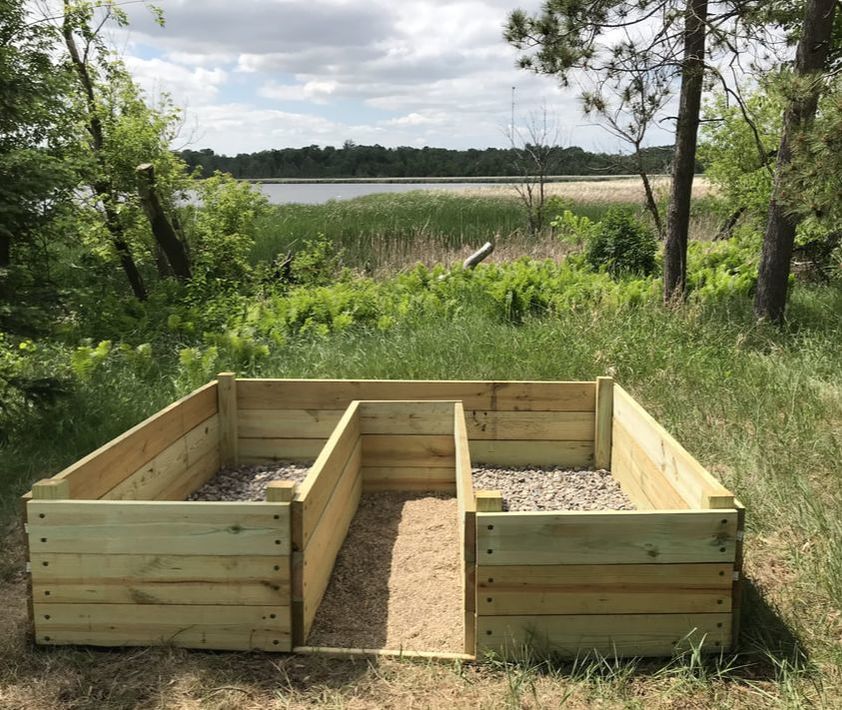
Our finished bed is 8' x 8' and 22.5" deep, has a 6' walkway into the middle of it, and offers 52 square feet of planting space. It could be used for any kind of vegetables, even deep-rooted ones.
I looked at tons of designs, browsed websites, read blogs, and finally came up with a design I liked. Now, anyone who knows me will tell you - I have a lot of creative ideas in my head, but my brain doesn't give me assembly instructions. So I drew out a rudimentary picture of what I wanted with some specifications, and I handed it off to my husband. He's the builder. His brain can look at something and figure out how to assemble it.
Our finished bed is 8' x 8' and 22.5" deep, has a 6' walkway into the middle of it, and offers 52 square feet of planting space. It could be used for any kind of vegetables, even deep-rooted ones.
Project Shopping List:
Two 8' 4x4's (cut into 2' lengths)
Twelve 8' 2x8's (*three will need to be cut)
Six 6' 2x8's
Four metal corner braces
Powerlag screws
Eleven bags of river rock
35 bags of mulch
Ten wheelbarrow loads of manure/compost
Four bags of pea gravel
25' of 3' wide landscape fabric
One 2x2 (cut to needed length - 24-26")
Staple gun and staples
Two 1.5" deck screws
~40 1" deck screws
*Cut three of the 2x8 boards into two 3' lengths and one 2' length. You should end up with nine 8' boards, three 2' boards, and six 3' boards.
First things first - Pick a good location. Depending on what you'll be planting, keep in mind how much sun your space will get, how close you are to a water supply, and remember that this project will take up an eight foot by eight foot space when completed.
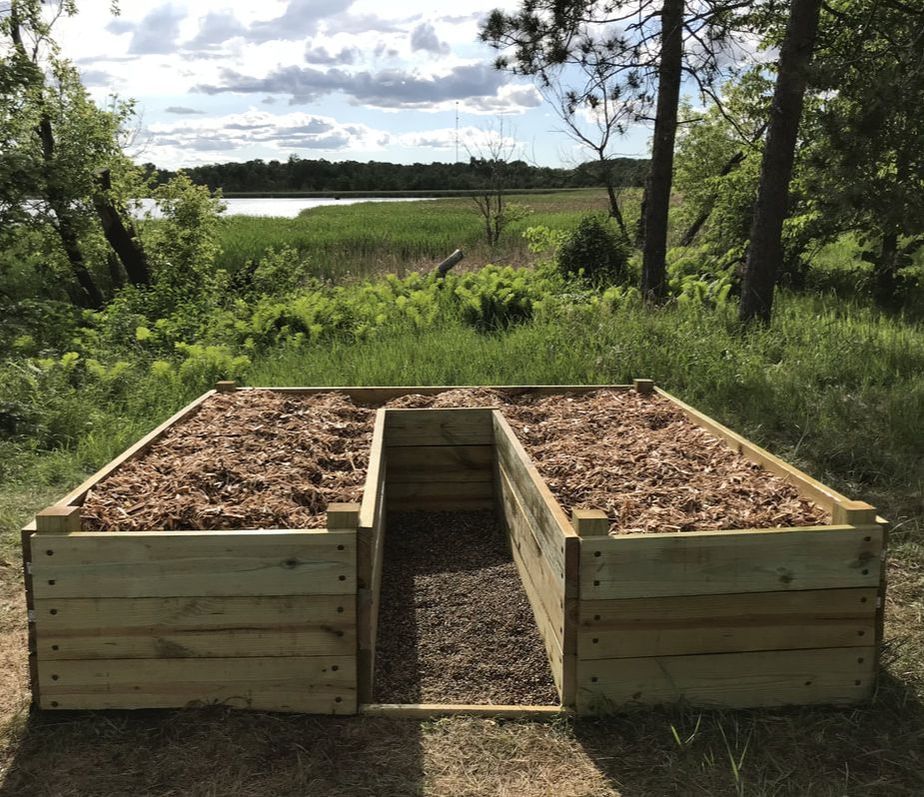
We selected a nice place on the West side of the house, overlooking the lake just beyond the apple tree. It gets full sun in the afternoon and there are no overhanging branches. A pine tree to the south of this location offers partial shade sometimes during the day.
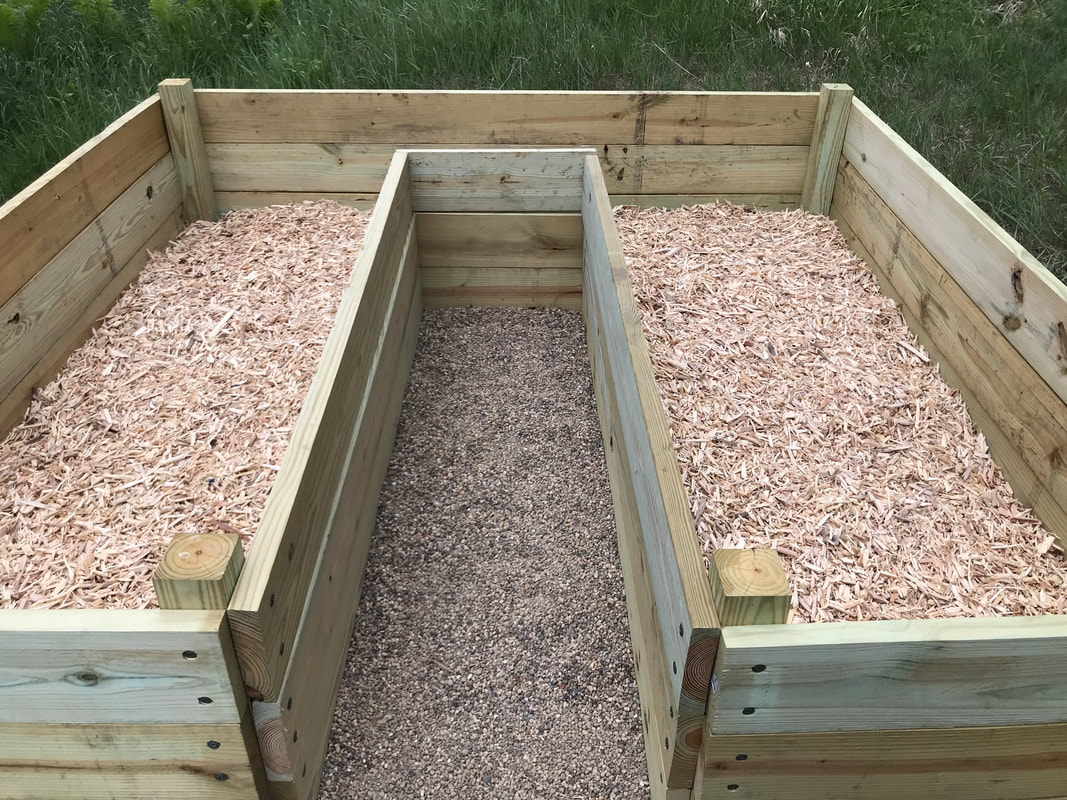
Lay out your boards and start with the basic frame work. One 8' 2x8 on either side, one on the back. The front should have one 3' board on either side, then a 6' board going into the square attached to either 3' side, and a 2' board at the end of the walkway. Use the 4x4 boards as bracing to keep your corners even. We chose not to use the 4x4 on the inside at the end of the walkway to allow me more space to reach into the garden. Instead we added bracers (see below). You can use the additional two 2' lengths at the end of your walkway if you prefer. Please see the photo below to better understand the layout.
We selected a nice place on the West side of the house, overlooking the lake just beyond the apple tree. It gets full sun in the afternoon and there are no overhanging branches. A pine tree to the south of this location offers partial shade sometimes during the day.
Lay out your boards and start with the basic frame work. One 8' 2x8 on either side, one on the back. The front should have one 3' board on either side, then a 6' board going into the square attached to either 3' side, and a 2' board at the end of the walkway. Use the 4x4 boards as bracing to keep your corners even. We chose not to use the 4x4 on the inside at the end of the walkway to allow me more space to reach into the garden. Instead we added bracers (see below). You can use the additional two 2' lengths at the end of your walkway if you prefer. Please see the photo below to better understand the layout.
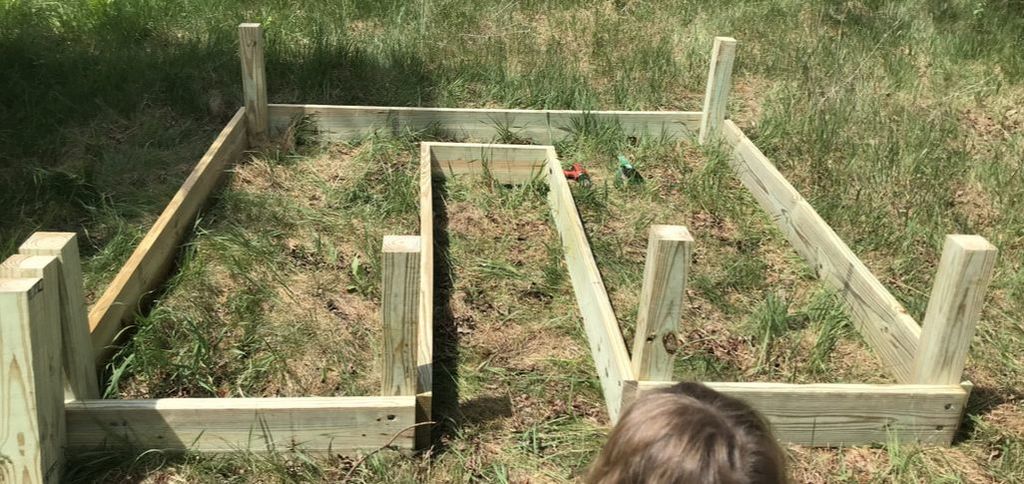
Now here comes the tricky part. You will have to flip your frame upside down so it's balanced on the 4x4 posts. A note here - if you used the 4x4's at the end of the walkway, carry on - you're good here. If you chose to use the bracers like we did, you will have to attach one of the additional 4x4 pieces to the end of your 2' board at the end of the walkway before turning it over. We did not at first and ended up stripping the screws and nearly breaking the frame because it had no support.
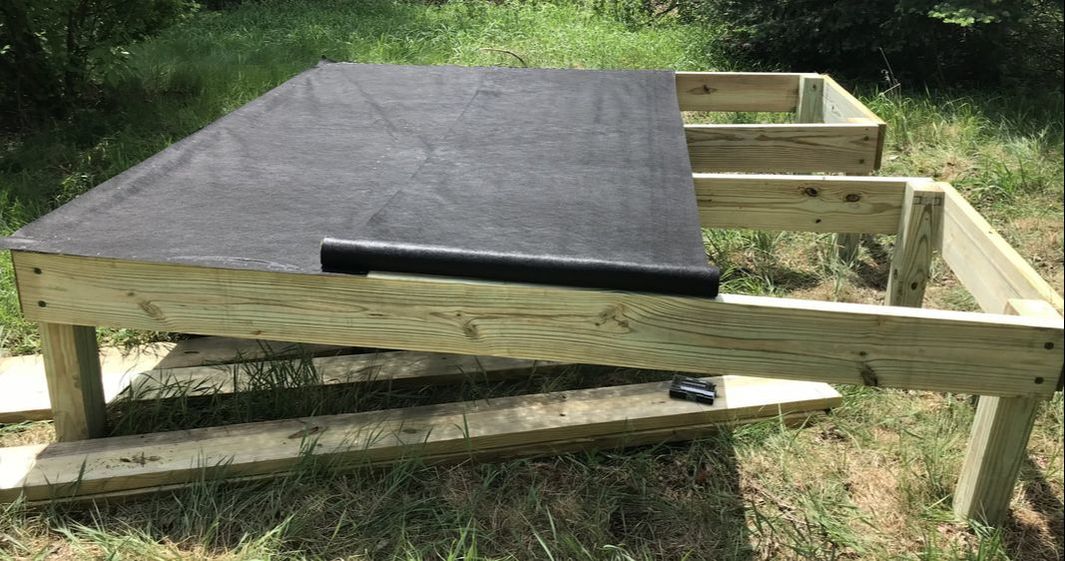
Once your frame work is upside-down, lay out your landscaping fabric and start stapling it onto the bottom (now the top) of your frame. Cover it entirely across from side to side (not front to back), and make sure to overlap your rows by at least a couple inches to deter any determined weeds or grass. We included a little extra on all edges just to try to keep nearby weeds to a minimum (we do not have a weed edger to make it easier to keep them at bay).
If you are laying your garden out on a nice flat piece of land, go ahead and make the fabric taunt. We did not level out the ground before this project, so we left the fabric a little loose (see photo below) to allow for the filler stuff to be able to settle without tearing the fabric.
Once your landscape fabric is secured, flip the frame back over to right-side-up. At this point you want to angle it perfectly and get it into position because from here on out it will be difficult to impossible to move. If you are using the bracket system like we did, be sure to remove the 4x4 board added to the end of the walkway as you no longer need it to brace the frame.
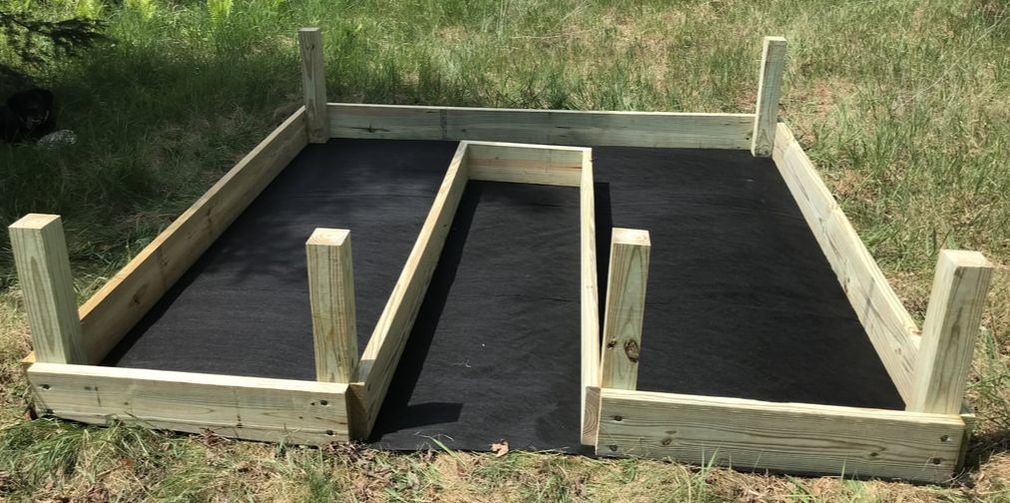
Now add on the rest of your boards in the same pattern. You will end up with three boards high on each side. We used four lag screws for each board, two on each end. For those of us more particular, inspect your boards and make sure the prettier side is facing out (where you can enjoy it).
Measure the space in the doorway at the base between the two 3' lengths of board. If you've laid everything out perfectly, it should be 24 inches. Ours ended up to be something like 25-3/4" because the ground isn't even so our 6' boards aren't as straight as they'd be on flat ground. Not a big deal, unless you have OCD. In which case, work with flatter ground.
Cut your 2x2 board to the length you need and screw it in using 1.5" deck screws. This will help keep the pea gravel in your walkway and not in your lawn.
Now add your pea gravel to your walkway. This adds a nice touch and covers up the landscape fabric. No weeds should be able to get up past the barrier, and if by chance some seeds drop in from the wind, the pea gravel assures they'll be easy to pick out if they try to grow.
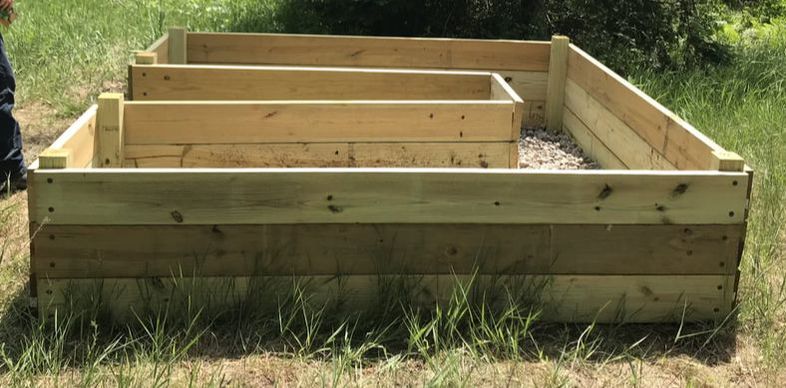
Put your river rock in the garden portion to cover the landscape fabric. Be careful of which way your landscape fabric is overlapped. If you put the rocks in from the wrong end they could end up puckering the landscaping fabric. You'll want enough river rock to cover the landscape fabric so you can't see it anymore.
We chose to use the river rock as our bottom layer for a few reasons. It's heavy and will help hold the landscape fabric down even with the unlevel ground. It will also provide an additional drainage space because he have clay soil and sometimes it can get waterlogged. The rocks will make sure that water-log doesn't effect anything growing in the bed.
Check out the amazing view from our strawberry garden!
Cut your 2x2 board to the length you need and screw it in using 1.5" deck screws. This will help keep the pea gravel in your walkway and not in your lawn.
Now add your pea gravel to your walkway. This adds a nice touch and covers up the landscape fabric. No weeds should be able to get up past the barrier, and if by chance some seeds drop in from the wind, the pea gravel assures they'll be easy to pick out if they try to grow.
Put your river rock in the garden portion to cover the landscape fabric. Be careful of which way your landscape fabric is overlapped. If you put the rocks in from the wrong end they could end up puckering the landscaping fabric. You'll want enough river rock to cover the landscape fabric so you can't see it anymore.
We chose to use the river rock as our bottom layer for a few reasons. It's heavy and will help hold the landscape fabric down even with the unlevel ground. It will also provide an additional drainage space because he have clay soil and sometimes it can get waterlogged. The rocks will make sure that water-log doesn't effect anything growing in the bed.
Check out the amazing view from our strawberry garden!
Once your river rock covers your landscape fabric, add a layer of mulch. The mulch will eventually break down to be part of the compost. We bought it on sale for less than $2 per bag, so it's more of a filler and aeration material for our plan here. If you can afford a truck load of good compost, feel free to fill your entire garden with it. For us, we plan to plant strawberries, so their roots will be pretty shallow anyway.
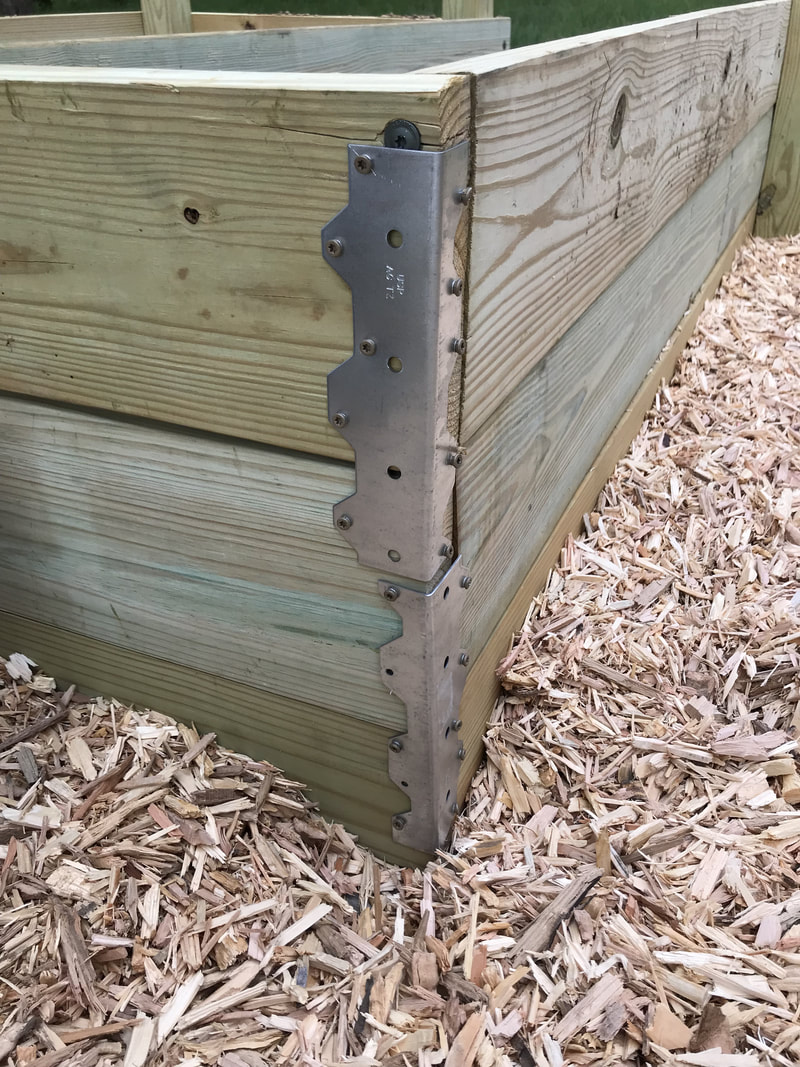
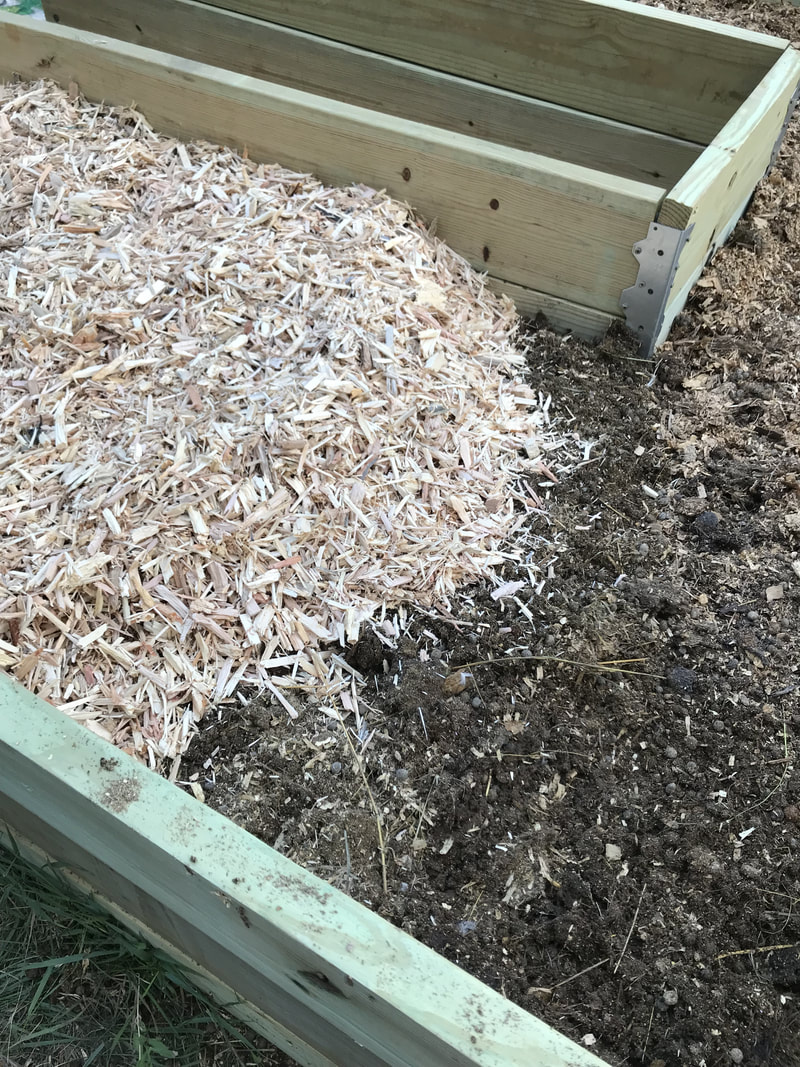
At this point we took a little break to put metal corner bracers on where the 6' boards meet the 2' boards. If you used the 4x4 boards to brace here, no worries. If you needed more reaching space, follow along here.
The bracers we used were to hold the bottom boards to the middle boards, and the middle boards to the top boards, because with no bracing they were each completely separate and slightly uneven. I'm not sure exactly what this piece is called. My husband picked them up at Menards. I am including a photo so you can see what they look like and how they're functioning. He used 1" deck screws to attach the metal bracers.
The bracers we used were to hold the bottom boards to the middle boards, and the middle boards to the top boards, because with no bracing they were each completely separate and slightly uneven. I'm not sure exactly what this piece is called. My husband picked them up at Menards. I am including a photo so you can see what they look like and how they're functioning. He used 1" deck screws to attach the metal bracers.
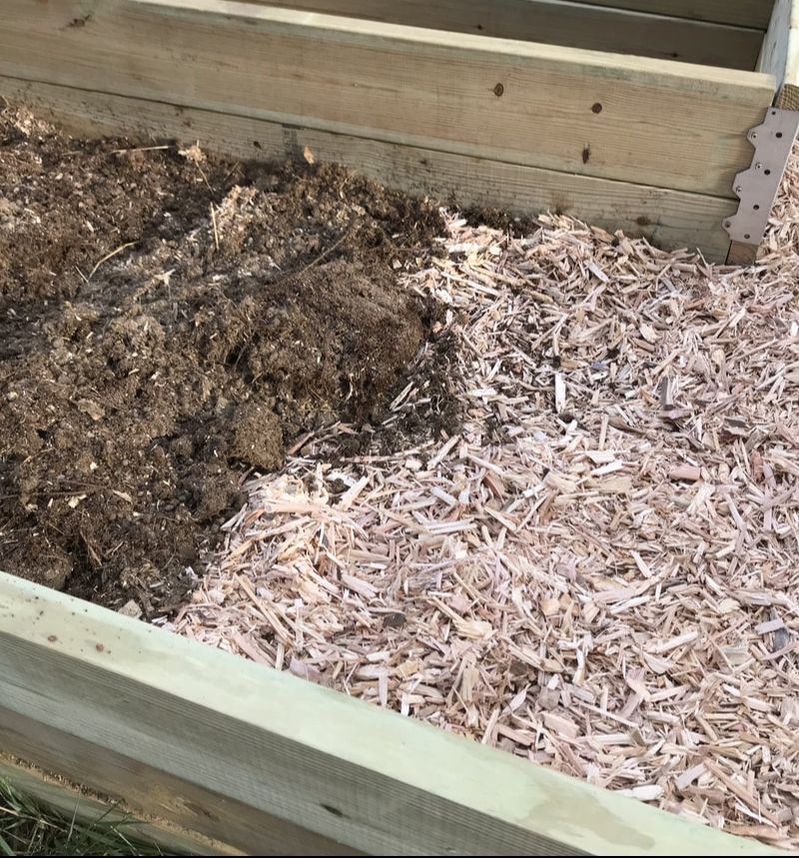
Layer a nice thick helping of compost and manure over the mulch. This could be one thick layer of compost and manure, or you can do a thinner layer, then more mulch, followed by another (thicker) layer of compost and manure above it. We did an extra layer (rocks, mulch, compost/manure, mulch, compost manure) at this point.
Keep in mind if you are doing multiple layers, that you want the top-most compost/manure to be thicker than all previous layers. This is what you will be planting into!
Keep in mind if you are doing multiple layers, that you want the top-most compost/manure to be thicker than all previous layers. This is what you will be planting into!
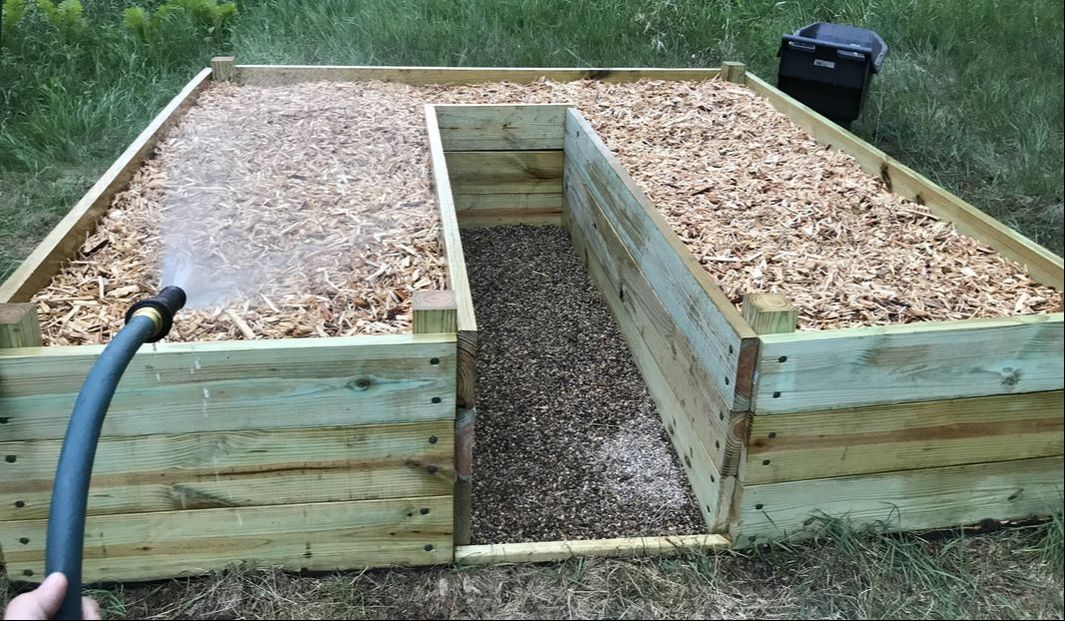
Once you've added the compost/manure layer that you'll be planting into, top it off with a good thick layer of mulch. We put ours about 4-6" deep, which still left the mulch about one finger length below the top of the boards.
You'll want the mulch to rest below the edge of the boards to help keep water in and to keep your mulch from spilling out and making a mess in your yard.
You'll want the mulch to rest below the edge of the boards to help keep water in and to keep your mulch from spilling out and making a mess in your yard.
You're almost done! Once you have all your mulch on top, it's time to soak everything down. You could be wetting every layer as you go, but you don't have to. We gave ours a thorough watering after it was all completed. Your goal is to be sure that even those rocks at the very bottom are getting wet. Want to test it? Dig some of the mulch away and dig into the compost below. If it's good and wet, you should be alright. If it's even a little dry, keep watering! Remember, if you used good landscape fabric, extra water will just go down into the dirt below, so it's better to over water at this point than to under water.
Remember those mulch layers down in there that you can't see anymore? They will help to retain moisture to keep your plants from drying out between rains or when you water. The mulch on top will help retain water as well as make it harder for weeds to find soil to grow.
Remember those mulch layers down in there that you can't see anymore? They will help to retain moisture to keep your plants from drying out between rains or when you water. The mulch on top will help retain water as well as make it harder for weeds to find soil to grow.
From here you could plant your new garden with just about any kind of annual or perennial assortment you wanted. Vegetables, fruits, flowers, whatever you will enjoy most. For us, we built this project for strawberries. We will be planting ours using the square foot method.
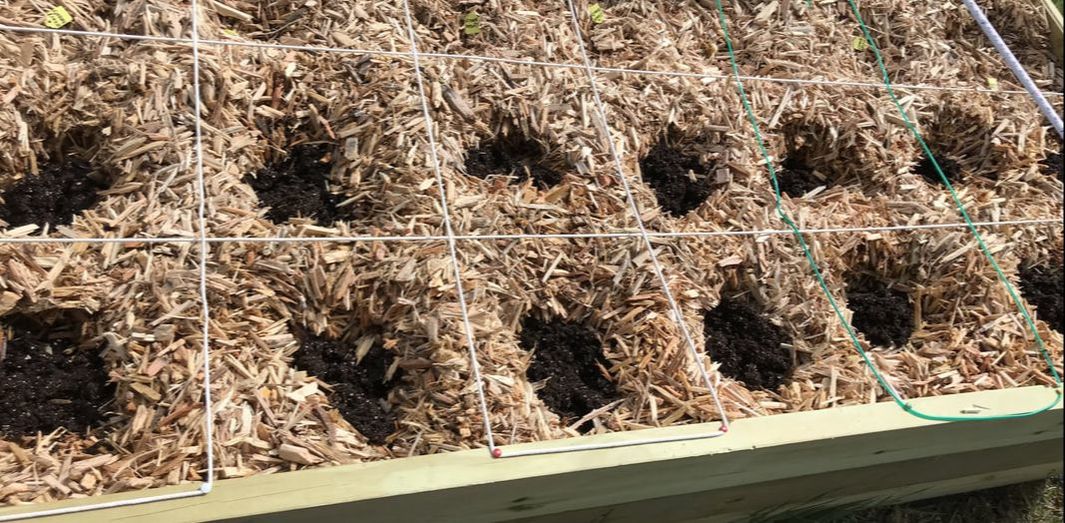
Mark out 12" increments along each edge (all four sides). Match up the lines from across the bed. You can attach a string or long board to help you keep a straight line measuring across the bed. You will end up with a grid, with each square being 12" x 12" or one square foot. For strawberries, plant one plant in the center of each square foot. This bed plan will give you 52 square feet to work with.
Mark out 12" increments along each edge (all four sides). Match up the lines from across the bed. You can attach a string or long board to help you keep a straight line measuring across the bed. You will end up with a grid, with each square being 12" x 12" or one square foot. For strawberries, plant one plant in the center of each square foot. This bed plan will give you 52 square feet to work with.

When you are planting your bed, pull back the mulch to expose the layer of compost below. Plant into the compost, not the mulch. For our garden, I dug down to the compost, and then added a scoop of ProMix just because our top layer of mulch is so thick (over 6" in some places).
Some people say cover the plant with the mulch right away, and some people say to give the plant a few days to a week to get bigger and stronger before covering with mulch. I think it depends on the plant. Small plants should be given time to get a good root system and longer stem before having their compost covered up with the mulch again. For bigger plants, filling in the mulch around them right away should be fine and will help them retain moisture, which could help with root growth and development in those first couple of days when they're stressed out.
Depending on your preference and materials, you can leave the lines on to differentiate your squares, or you can remove them once you've planted your garden. I used laundry line and push pins and removed them once everything was planted. In the past for square-foot-gardening I have used hemp twine tied to sticks and left it in (it did fall apart by the end of the season).
Be sure to water your newly transplanted plants right away. Keep in mind that a deep drink once a week is better than a small sip every day. You want the water to get down into the compost and encourage root growth deeper into the substrate.
Check your garden bed daily. The top of the mulch will dry out, but you want to dig down a little to make sure it's still retaining moisture underneath. Don't let your compost dry out. Newly transplanted plants will need more frequent watering for the first week or two to help stimulate root growth. If you're starting from seed directly into the compost, you'll need to keep it moist for longer until your seeds have germinated and have their first true leaves.
Check your garden bed daily. The top of the mulch will dry out, but you want to dig down a little to make sure it's still retaining moisture underneath. Don't let your compost dry out. Newly transplanted plants will need more frequent watering for the first week or two to help stimulate root growth. If you're starting from seed directly into the compost, you'll need to keep it moist for longer until your seeds have germinated and have their first true leaves.
This photo was taken immediately after planting the bed with 45 bare root strawberry plants and two store-bought plants and then giving it a good soak with the hose. As the plants grow in, I will move the mulch around to make the surface more even.
Now sit back, enjoy your garden, and hopefully soon you will have food or blooms, or maybe some of each depending on what you plant in yours!
**Photos to come from this point on (we're not quite there yet)...
**Photos to come from this point on (we're not quite there yet)...
Please, feel free to use my tutorial to make your own raised bed garden. Make modifications, change it to make it suit your needs. I would love to see what you come up with! All I ask is that if you blog or post your garden to social media, please put a link back to this page so other people can use the tutorial too. Thank you and enjoy!
